0.6 Deploying your first dapp
Now that you've covered the fundamentals of ICP, it's time to start developing your first application. To get started quickly and seamlessly, you'll use ICP Ninja, which was introduced in the previous module, 0.5: Introduction to tooling.
The video corresponding to this tutorial is outdated.
Projects on ICP have a default architecture of two canisters: a frontend canister and a backend canister. The frontend canister is essentially a web server. It stores the web assets for the application’s user interface and interacts with the backend through the use of an agent. The backend canister stores the application’s data and provides endpoints to access and modify the data. Backend canisters can be written in a variety of different languages (Motoko, Rust, TypeScript, and more) through the use of canister development kits (CDKs).
Hello, world!
- Motoko
- Rust
This tutorial will use the Motoko "Hello, world!" example on ICP Ninja.
Let's review the project's file structure:
├── backend      # Folder containing the source code of your dapp's backend.
│   ├──  app.mo  # The default source code file; this is the file you'll be working with in this tutorial.
├── frontend     # Folder containing the asset files for your dapp's frontend.
│   ├──  index.html   # Entrypoint file for the frontend.
│   ├──  package.json
│   ├──  vite.config.js
├── dfx.json     # The configuration file for your Internet Computer dapp.
├── mops.toml    # Package configuration file for Motoko.
├── README.md    # Information about the project and using ICP Ninja.
dfx.json
The dfx.json file in the root directory defines the canisters that make up the application and where their source code is located. This project uses the following dfx.json file:
{
  "canisters": {
    "backend": {
      "main": "backend/app.mo",
      "type": "motoko",
      "args": "--enhanced-orthogonal-persistence"
    },
    "frontend": {
      "dependencies": ["backend"],
      "frontend": {
        "entrypoint": "frontend/index.html"
      },
      "source": ["frontend/dist"],
      "type": "assets"
    }
  },
  "output_env_file": ".env",
  "defaults": {
    "build": {
      "packtool": "mops sources"
    }
  }
}
Learn more about dfx.json.
This tutorial will use the Rust "Hello, world!" example on ICP Ninja.
Let's review the project's file structure:
├── backend      # Folder containing the source code of your dapp's backend.
│   ├── Cargo.toml # Package configuration file for Rust.
│   ├── lib.rs   # The default source code file; this is the file you'll be working with in this tutorial.
├── frontend     # Folder containing the asset files for your dapp's frontend.
│   ├──  index.html   # Entrypoint file for the frontend.
│   ├──  package.json
│   ├──  vite.config.js
├── dfx.json     # The configuration file for your Internet Computer dapp.
├── mops.toml    # Package configuration file for Motoko.
├── README.md    # Information about the project and using ICP Ninja.
dfx.json
The dfx.json file in the root directory defines the canisters that make up the application and where their source code is located. This project uses the following dfx.json file:
{
  "canisters": {
    "backend": {
      "candid": "backend/backend.did",
      "type": "custom",
      "shrink": true,
      "gzip": true,
      "wasm": "target/wasm32-unknown-unknown/release/backend.wasm",
      "build": [
        "cargo build --target wasm32-unknown-unknown --release -p backend",
        "candid-extractor target/wasm32-unknown-unknown/release/backend.wasm > backend/backend.did"
      ],
      "metadata": [
        {
          "name": "candid:service"
        }
      ]
    },
    "frontend": {
      "dependencies": ["backend"],
      "frontend": {
        "entrypoint": "frontend/index.html"
      },
      "source": ["frontend/dist"],
      "type": "assets"
    }
  },
  "output_env_file": ".env"
}
Learn more about dfx.json.
Cargo.toml
Your project's Cargo.toml file in the backend folder specifies the path to the main source file and lists the Rust packages (crates) your lib.rs file depends on. This configuration allows the Rust compiler to know how to build and link your code. This project uses the following Cargo.toml file:
[package]
name = "backend"
version = "0.1.0"
edition = "2021"

# See more keys and their definitions at https://doc.rust-lang.org/cargo/reference/manifest.html

[lib]
crate-type = ["cdylib"]
path = "lib.rs"

[dependencies]
candid = "0.10.10"
ic-cdk = "0.16.0"
ic-stable-structures = "0.6.7"
Backend
- Motoko
- Rust
Now, let's review the backend/app.mo file to learn about the application's functions.
persistent actor HelloWorld {
  // We store the greeting in a stable variable such that it gets persisted over canister upgrades.
  var greeting : Text = "Hello, ";

  // This update method stores the greeting prefix in stable memory.
  public func setGreeting(prefix : Text) : async () {
    greeting := prefix;
  };

  // This query method returns the currently persisted greeting with the given name.
  public query func greet(name : Text) : async Text {
    return greeting # name # "!";
  };
};
- First an actor named
HelloWorldis defined. An actor is an object that can hold state and interact with the world through messages.- This actor is defined as
persistent, meaning the variables within the actor will be stored in stable memory and persist across canister upgrades.
- This actor is defined as
- Then a variable called
greetingis defined. - A method is defined to modify the canister's state and update the text stored in the
greetingvariable. - A method will query and return the text stored in
greeting,followed by the text passed to the method.
If you want to learn more about this code, you can right-click and select "Ask AI - Explain" to get a more detailed breakdown of the code's syntax and components.
Now, let's review the backend/lib.rs file to learn about the application's functions.
use ic_stable_structures::{
    memory_manager::{MemoryId, MemoryManager, VirtualMemory},
    DefaultMemoryImpl,
};
use std::cell::RefCell;

type Memory = VirtualMemory<DefaultMemoryImpl>;

// To store global state in a Rust canister, we use the `thread_local!` macro.
thread_local! {
    // The memory manager is used for simulating multiple memories. Given a `MemoryId` it can
    // return a memory that can be used by stable structures.
    static MEMORY_MANAGER: RefCell<MemoryManager<DefaultMemoryImpl>> =
        RefCell::new(MemoryManager::init(DefaultMemoryImpl::default()));

    // We store the greeting in a `Cell` in stable memory such that it gets persisted over canister upgrades.
    static GREETING: RefCell<ic_stable_structures::Cell<String, Memory>> = RefCell::new(
        ic_stable_structures::Cell::init(
            MEMORY_MANAGER.with(|m| m.borrow().get(MemoryId::new(0))), "Hello, ".to_string()
        ).unwrap()
    );
}

// This update method stores the greeting prefix in stable memory.
#[ic_cdk::update]
fn set_greeting(prefix: String) {
    GREETING.with_borrow_mut(|greeting| {
        greeting.set(prefix).unwrap();
    });
}

// This query method returns the currently persisted greeting with the given name.
#[ic_cdk::query]
fn greet(name: String) -> String {
    let greeting = GREETING.with_borrow(|greeting| greeting.get().clone());
    format!("{greeting}{name}!")
}

// Export the interface for the smart contract.
ic_cdk::export_candid!();
- First the
ic_stable_structuresmemory manager is defined, followed by thethread_local!macro. This stores the program's variables in stable memory so their values will persist across canister upgrades. Stable memory will be covered at length in a future module. - The
set_greetingmethod is defined to modify the canister's state and update the text stored in thegreetingvariable. - The
greetmethod will query and return the text stored ingreeting,followed by the text passed to the method.
If you want to learn more about this code, you can right-click and select "Ask AI - Explain" to get a more detailed breakdown of the code's syntax and components.
Calling the backend canister
Click the "Run" button in the upper right corner of the code editor. ICP Ninja will deploy the project, then return the project's canister URLs:
Deploying code onchain...
→ Reserving canisters onchain
→ Building backend
→ Building frontend
→ Uploading frontend assets
Backend Internet Computer URL:
https://a4gq6-oaaaa-aaaab-qaa4q-cai.icp1.io/?id=6kwk6-qqaaa-aaaab-qbmga-cai
🥷🚀🎉 Your dapp's Internet Computer URL is ready:
https://4u45u-3aaaa-aaaab-qbluq-cai.icp1.io
⏰ Your dapp will be available for 20 minutes
The backend canister URL will bring you to a Candid API interface that allows you to call the methods defined in the backend.
In the greet method input box, insert the input "ICP," then select the "Query" option. The call will be sent to the greet method, which was given the input "ICP." The backend canister will process the call and return the response defined in the method. Since the method is defined as a query method, the canister simply returns data to the caller; it does not alter the canister's state.
("Hello, ICP!")
In contrast, setGreeting (Motoko variation) / set_greeting (Rust variation) is an update call that does alter the canister’s state. Calling it will change the data stored in the greeting variable, which will then result in the greet function returning a different response when called.
Insert "Hi, " into the setGreeting (Motoko variation) / set_greeting (Rust variation) function's input, then select "Call." Then, call the greet function again and observe the new output.
("Hi, ICP!")
Frontend
The frontend of an application is used to facilitate user interaction with the methods defined in the backend. It is made up of assets, most commonly HTML, CSS, and JavaScript.
On ICP, an application's frontend is created through these steps:
A developer creates frontend assets.
The project's
dfx.jsonfile defines the frontend canister and specifies it as"type": "asset".When the project is deployed,
dfxdeploys an implementation of the asset canister interface to the canister. It then adds an API client called the ICP JavaScript agent to the frontend assets and uploads all assets to the canister. The ICP JavaScript agent facilitates the communication between the frontend and the backend. In general, ICP agents are libraries for interacting with canisters' public interfaces.
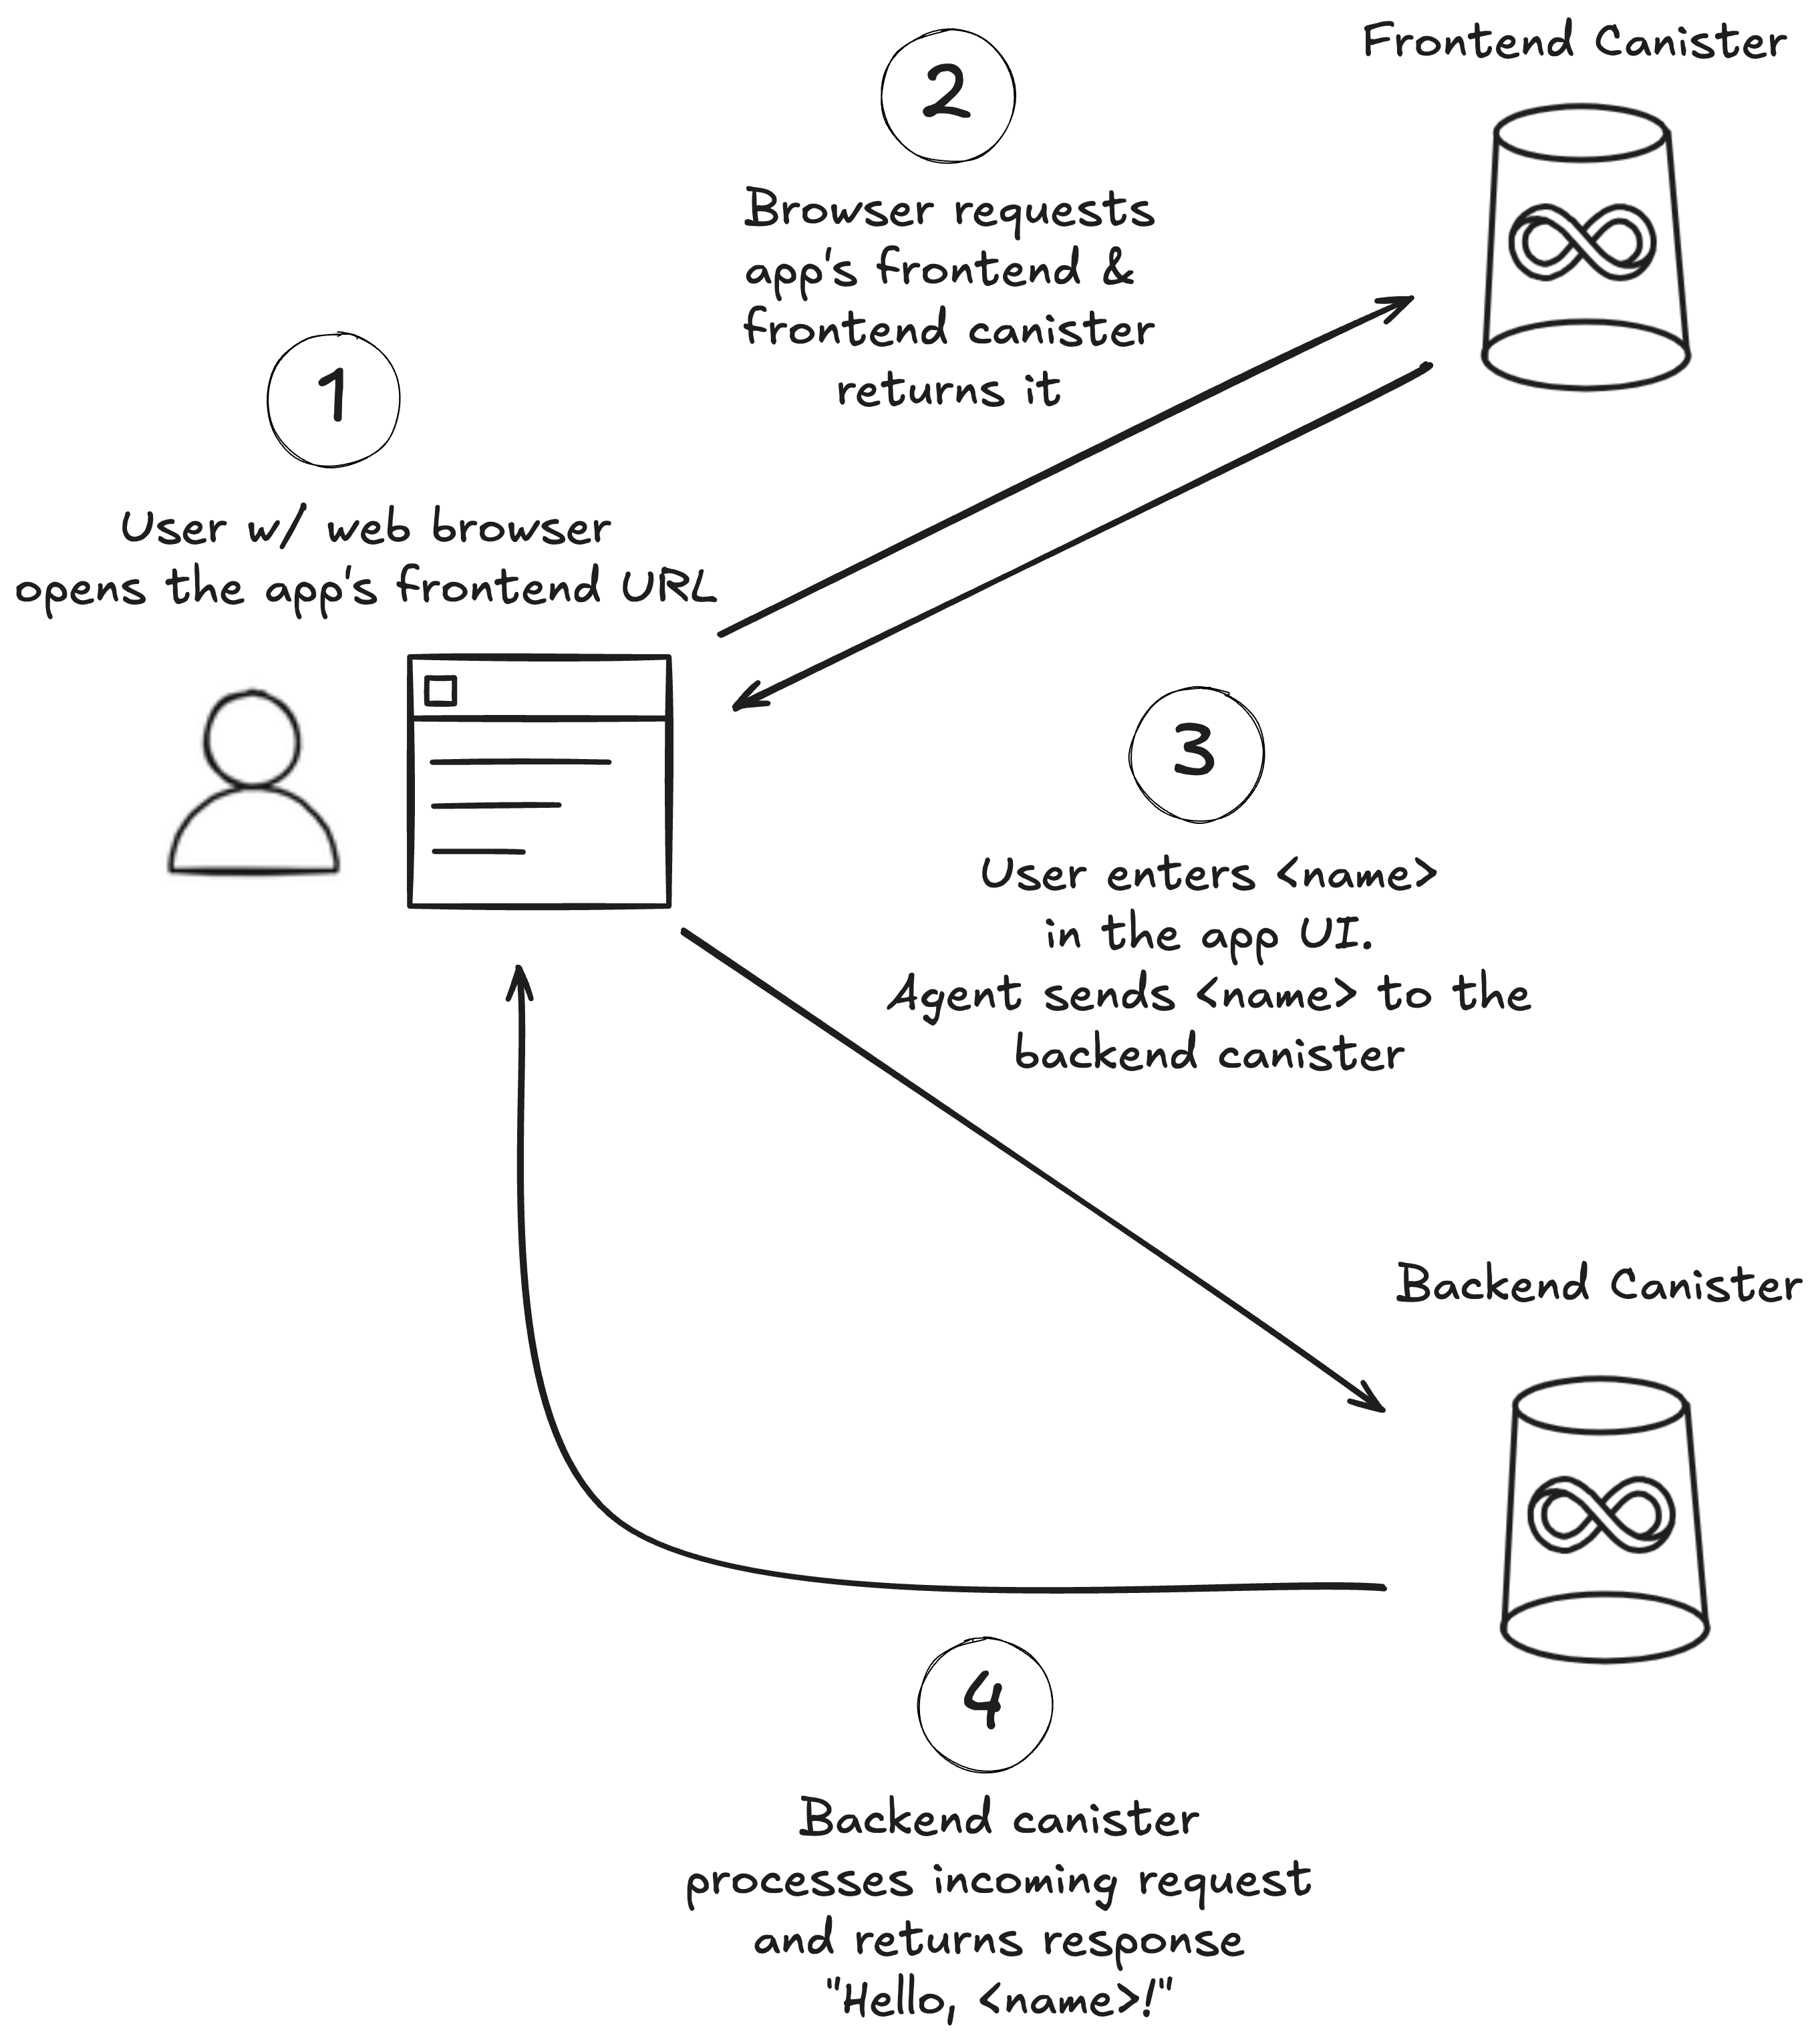
How does the frontend communicate with the backend?
When a user loads the application, the web browser fetches the user interface from the frontend canister. Once the frontend is loaded into the browser, the user can interact with it, triggering messages to be sent to the backend.
For example, the src/hello_frontend/index.html file defines a simple HTML page that embeds the JavaScript code used to communicate with the backend canister:
    <script type="module">
      // Import the backend actor
      import { backend } from 'declarations/backend';
      // Add an event listener to the form
      document.querySelector('form').addEventListener('submit', async (e) => {
        e.preventDefault();
        // Get the name from the input field
        const name = document.getElementById('name').value.toString();
        // Calling the method "greet" on the backend actor with the name
        const greeting = await backend.greet(name);
        // Display the greeting returned by the backend actor
        document.getElementById('greeting').innerText = greeting;
      });
    </script>
In this script, the backend declarations are imported with import { backend } from 'declarations/backend';. Declaration files define the public methods of a canister and their input and output types. Motoko declaration files are generated by dfx during the build process, while Rust declarations must be exported with the candid_extractor tool or written by hand. In this example's Rust variation, the declaration file is exported using the candid_extractor. If you build this project locally, you will see the project's declaration files; they are not shown in the ICP Ninja file viewer.
When the agent makes a call to the backend canister, it uses these declaration files to determine which public methods it can submit requests to. Then it will create and send the request containing the request type, canister ID, method name, and any input or arguments to be passed to the method.
In this example, the user interface includes a text input box and a button to submit the input. When the button is pressed, the ICP JavaScript agent sends a request to the backend canister's greet method that includes the user's text input. The backend processes the request, then responds to the agent with an outgoing message that includes the result of the method.
Viewing the dapp on the mainnet
In the deployment output, there are two canister URLs. Open the second URL to view the frontend of your application deployed on the mainnet. You should see a very simple "Enter your name" input box. Insert your name, then click the "Click me!" button. You will see the response, "Hello, <name>!", indicating that your text input was successfully received and processed by the backend's greet method.
Want to share your new dapp with a friend? Simply send them the frontend canister's URL, such as: https://7azie-saaaa-aaaab-qbmba-cai.icp1.io
Continue developing with this dapp, pick another ICP Ninja template to explore, or create a new project to get started building your next project!
 Need help?
Did you get stuck somewhere in this tutorial, or do you feel like you need additional help understanding some of the concepts? The ICP community has several resources available for developers, like working groups and bootcamps, along with our Discord community, forum, and events such as hackathons. Here are a few to check out:
- Developer Discord
- Developer Liftoff forum discussion
- Developer tooling working group
- Motoko Bootcamp - The DAO Adventure
- Motoko Bootcamp - Discord community
- Motoko developer working group
- Upcoming events and conferences
- Upcoming hackathons
- Weekly developer office hours to ask questions, get clarification, and chat with other developers live via voice chat.
- Submit your feedback to the ICP Developer feedback board